Table of Contents
Data Format Guidelines
The purpose of this document is to standardize the format/representation of data when presented on a PASI screen or PASI generated document.
Vision
PASI data is presented in different context and medium to various groups of users (students, teachers, school authorities, etc). Format of common data types should be standardized to help promote consistent communications between users and user groups.
User interface and Document Classifications
UI screens and documents from PASI can be generalized into 2 categories:
- External – these are screens and documents that may be seen by the public, i.e. the students. This includes screens of myPass, DAR, ASN Certificates, etc.
- Internal – all other screens and documents that do not fall in the External category, e.g. screens of PASIprep.
The data format requirements are different between the 2 categories; data represented in the External category needs to be user-friendly and unambiguous, whereas the data represented in the Internal category may be more query/reporting friendly.
Example:
- A date format of MMM-DD-YYYY is sortable in a table and easier for Internal users to work with when handling a large set of data; however, in an External situation, it may not be obvious for a user to determine which value is the month and which is the day when they see that date format – using a MMM DD YYYY format instead is easier for an external user to read.
The following table categorizes the documents and screens of PASI into External/Internal:
| External | Internal |
|---|---|
|
|
Data Value Format Guidelines
The following table shows the data format used for different types of values when it is displayed to a user.
For Internal views, data shown in grids and labeled forms may ignore the format prescribed below if it is showing individual values in its own column/field (e.g. if there are individual columns for First Name, Last Name, Suffix and Middle Name of a student’s name, it would not be formatted to {Last Name} {Suffix}, {First Name} {Middle Name} as shown below.).
The formats below shows the data in its fullest form; if certain values are optional and are blank, ensure the white space and commas used to format that value are hidden if the value is blank.
- e.g. Address (Single line) format is {Street}, {City}, {State/Province}, {Country}, {ZIP/Postal Code}.
- e.g. 82 Fake Street, Edmonton, Alberta, Canada, H0H 0H0
- (Address in fullest form; no blank values)
- e.g. 98 Nathan Street, Jordan, Hong Kong, Hong Kong SAR
- (No ZIP/Postal Code and State/Province, hence the commas and whitespace for those values are removed)
Names
External Format: {First Name} {Middle Name} {Last Name} {Suffix} (Note: Omit the Last Name if it is 'LNU')
Internal Format: {Last Name} {Suffix}, {First Name} {Middle Name}
When length is an issue, the name may be shortened using the following formats:
- {First Name} {Initial of Middle Name}. {Last Name} {Suffix}
- {Initial of First Name}. {Initial of Middle Name}. {Last Name} {Suffix}
- {Initial of First Name}. {Initial of Middle Name}. {Last Name}
The maximum length of the shortest format is 56 characters: 50 for the last name and three for the first & middle name initial, period and space.
Times
External Format: HH:MM (a.m./p.m.) {optional timezone}
- Timezone can be specified globally on the view, or individually on each timestamp.
- Using the Alberta Time is preferred over the user's timezone *
- Single digit hours will be prefixed with a zero, e.g. 01:32 p.m.
Internal Format: HH:MM {AM/PM}
- Alberta Time Zone is always used
- Single digit hours will be prefixed with a zero, e.g. 01:32 PM
Addresses
Refer to Formatted Mailing Address.
Phone Numbers
Standard 10-digit North American standard format: (xxx) xxx-xxxx ext. {extension} Other Phone Number formats: (as entered by the user)
School Year
External Format:
- Preferred Format: YYYY/YYYY
- Short Format: YY/YY
- Should only be used when space is an issue.
- A hyphen is used in French for school years, e.g. “2013-2014”, OR “13-14” if a short format is required.
Internal Format: YYYY/YYYY
Exam Period
External Format: {Exam Period - Short Description} YYYY
- For example: January 2017
- The year must be the appropriate calendar year associated to the exam period
Internal Format: YYYY/YYYY {Exam Period - Code Text)
- For example: 2016/2017 JAN
Course
Refer to Course for data format details.
Document Order Number
Format: ##########
- The number will be padded to 10 digits as needed
Document Order Item Number
Format: XXXXXXXXXX-YY
- X is the Order ID
- Padded to 10 digits if needed.
- Y is the Order Item ID
- Padded to 2 digits if needed
Code Values
Format: {Code Short Description} ({Code Text})
- The Code Text is recommended, but is optional if it does not make sense to display.
- When code values are presented together, e.g. dropdown, the sort order will be first by Sequence Number ascending then by Code Short Description ascending.
Credential Number
Format: XXXXX-XXXXX
Exam Sitting
| Single-Line Format: | {Writing Centre Name} ({Writing Centre Code}) - Location: {Location} |
| Multi-Line Format: |
{Writing Centre Name} ((Writing Centre Code}) |
Section
| Single-line format: | {Section Description} (Term: {Term}) |
| Multi-line format: |
{Section Description} |
School Enrolment
If the enrolment has a start date but not an end date: {Registration Type Short Description} (Starting {Registration Start Date})
If the enrolment has a start and end date: {Registration Type Short Description} ({Registration Start Date} to {Registration Exit Date})
Address Formatting
The format used for addresses depends on where the address is displayed, and the country of the address. The following diagram illustrate which address format should be used for the specified scenarios:

dataformatguidelines_addresschart.vsd
Note 1: Address is in Canada if the Address’ Country matches one of the following accepted country name variant (case insensitive):
- Canada
- CAN
- CA
Note 2: Address is in USA if the Address’ Country matches one of the following accepted country name variant (case insensitive):
- United States
- USA
- U.S.A
- U.S.A.
- US
- U.S
- U.S.
Address Formats
The formats below shows the data in its fullest form; if certain values are optional and are blank, ensure the whitespace and commas used to format that value are hidden if the value is blank.
- e.g. The “Display - Single line” format is {Street}, {City}, {State/Province}, {Country}, {ZIP/Postal Code}.
- e.g. 82 Fake Street, Edmonton, Alberta, Canada, H0H 0H0
- (Address in fullest form; no blank values)
- e.g. 98 Nathan Street, Jordan, Hong Kong, Hong Kong SAR
- (No ZIP/Postal Code and State/Province, hence the commas and whitespace for those values are removed)
The following address formats applies to both External/Internal views.
| Format Name | External / Internal Format |
|---|---|
| Display – Single line | {Street}, {City}, {State/Province}, {ZIP/Postal Code}, {Country} Note:
Street can have multiple lines – replace new line characters with “, “ (comma & space) to create one line. |
| Display – Canadian – Multiple Lines |
Line 1: {Street} Note:
Preserve any newline character in {Street} (therefore it may be more than one line) |
| Display – International – Multiple Lines |
Line 1: {Street} Note:
Preserve any newline character in {Street} (therefore it may be more than one line) |
| Mailing - Canadian | see Formatted Canadian Mailing Address guidelines. |
| Mailing - US | see Formatted United States Mailing Address guidelines. |
| Mailing – International | see Formatted Internation Mailing Address guidelines. |
Mailing Address Formats
See Formatted Mailing Address for more information
Student Address and Document Order Item Address Mapping
When using a Student’s Address on a Document Order item, the following mapping rules to recipient address are observed:
- If the Student Mailing Address is in Canada (i.e. the Country Name of the Address is “Canada” or one of the accepted variants specified in Address Formatting):
| Document Order Item Field | Student Mailing Address Field |
|---|---|
| Recipient Address Lines | Street |
| Recipient City | City |
Recipient State/Province Note:
| State/Province |
Recipient Postal Code Note:
| Postal Code |
| Recipient Country | “Canada” |
Note:
- the Country will not appear on the mailing label – it will just be used to determine it is a Canada address
- If the Student Mailing Address is in US (i.e. the Country Name of the Address is “United States” or one of the accepted variants specified in Address Formatting):
| Document Order Item Field | Student Mailing Address Field |
|---|---|
| Recipient Address Lines | Street |
| Recipient City | City |
Recipient State/Province Note:
| |
| Recipient Postal Code | Postal Code |
| Recipient Country | “United States” |
- If the Student Mailing Address is International (i.e. not Canada or US):
| Document Order Item Field | Student Mailing Address Field |
|---|---|
| Recipient Address Lines | {Street} (Note: this may be multiple lines) {City} {State/Province} {Postal Code} |
| Recipient City | <null> |
| Recipient State/Province | <null> |
| Recipient Postal Code | <null> |
| Recipient Country | Country |
PDF Address Formatter
The PASI PDF Address Formatter ‘prints’ an address on a PDF document after a PDF file has been generated. This is to support a ‘common’ formatter across all types of PDF files that PASI generates. * When formatting the mailing address for a PDF, the last line (line 6 of the 6-line Mailing Address block) should always printed in the same place. This means that if there are five lines of addressing, the first line would be a blank line and the last line would contain the last line of the address.

dataformatguidelines_pdf_address.vsd
The common address formatter will take the address values from the source data objects and formats and prints the address on the PDF so that it will fit on the window of a mailing envelope. It follows the same rules defined in section Address Formats and Mailing Address Formats; however, since it expects the source data already observes the data format rules, its choice of selecting the address format is simplified:
- If Country is “Canada” or any of the accepted Canada country name variants (as documented in Address Formatting), use the Mailing – Canadian address so that the country is not printed
- If Country is not “Canada” (or any of the accepted Canada country name variants as documented in Address Formatting), and a City/Province/Postal Code value exist, use the International Long format
- This covers US format as well, since at this point, the source data should already have proper ZIP codes and State values, and there’s no other difference between US and International Long format aside from US format enforces proper ZIP codes and State values.
- If Country is not “Canada” (or any of the accepted Canada country name variants as documented in Address Formatting), and City/Province/Postal Code values does not exist, use the International Short format.
Letter Format
All letters should follow the following styles and guidelines.
General Styles
- Default font: Arial (Regular), 10pt, black
Print Layout
The cover letter should be formatted to print on standard letter size stock paper that is 8.5” X 11” in portrait orientation.
For letters, the goal is to keep the content at a 1 page limit.
A buffer zone of 3/4 of an inch from edge of left side of the page must remain blank. The letter page of this document should be built such that the margins are described below (printable page):
| Margin | Margin Width |
|---|---|
| Left | .10 inches |
| Right | .10 inches |
| Top | 0 inches |
| Bottom | 0 Inches |
Letterhead

- The Alberta Signature Logo appears on the left corner while address appears on the right corner.
- Additional information (e.g. processed date) appears below the address with 1 to 3 new lines separation (use 3 new lines if there is enough room to fit content; and reduce new lines as needed if the content is longer); they are aligned with the address.
- An Address Window Area sits below the logo is available for displaying a mailing address to the recipient of the letter.
Alberta Signature
- Alberta Vertical Logo to be placed on the top left hand side of the document. Please refer to the specification of minimum size and buffer zone from the GOA Corporate Identity Guidelines.

- Unless otherwise specified, letters with the Alberta Government Signature should be printed in non-color version i.e. Black and White only (no alpha channel / transparency). Refer to the GOA Corporate Identity Guidelines.

English Letterhead Address
Letterhead includes the same information as the pre-printed stationary.
Letterhead Address:
Alberta Education
44 Capital Boulevard
10044 – 108 Street
Edmonton, Alberta T5J 5E6
Canada
myPass.alberta.ca
- Position of Address: As specified in section 4.1.4.2.1 of Corporate Identify Manual.
- Typographic and Symbol Features: Follow the information in section 4.1.4.2.1 of Corporate Identify Manual.

French Letterhead Address

Letterhead Address (please ensure accents and superscripts are observed):
Alberta Education
Édifice 44 Capital Boulevard
10044, 108e Rue N.-O.
Edmonton (Alberta) T5J 5E6
Canada
myPass.alberta.ca
- Position of Address: Same as English
- Typographic and Symbol Features: Same as English
Mailing Envelope Requirements
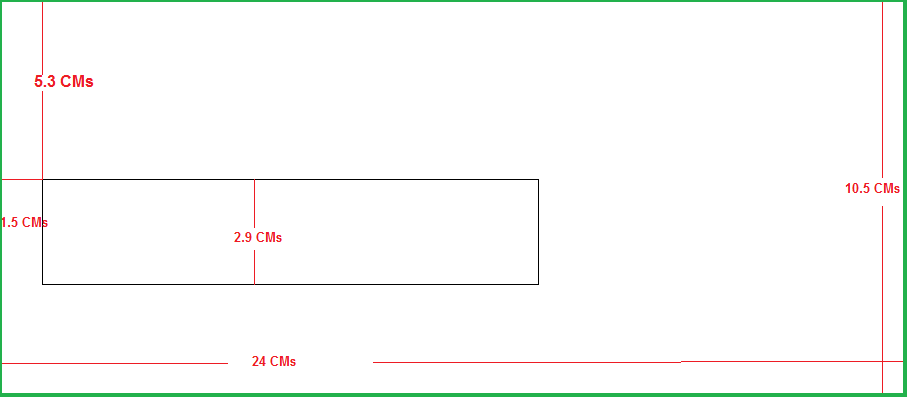
Mailing Envelope provided by the envelope supplier measures as shown below: This mailing envelope window positioning is the standard for different document types.
- Has wiggle room of 2CMs based on 8.5 x 11 paper insert
- The Mailing window starts at 1.5CMs (From Left Edge) X 5.3 CMs (From Top Edge)
A letter with a 9.5cm top fold can move around inside the standard envelope. To account for this, the address should fit inside the intersection of the address windows when drawn on a top-right and bottom-left aligned letter. This intersection has the following size and position:
- Top: 5.25 cm
- Left: 1.5 cm
- Width:9.25 cm
- Height:2.25 cm
The address box used for PASI should have the following size and position:
- Top: 5 cm
- Left: 1.75 cm
- Width:9.57 cm (max)
- Height:2.25 cm (max)
The address box used for PASI differs from the address window intersection for the following reasons:
- Increasing the left margin provides whitespace between the address and envelope and ensures clearance of OMR codes.
- The increased width is used to get as close as possible to the 60 character line maximum assuming an average character width without overlapping existing right-aligned report content.
- Addresses of varying line count are bottom-aligned, to a maximum of 6. The 6 line address is roughly centered vertically in the address window for a letter sitting in the bottom of the envelope.
- If a letter is sitting in the top of the envelope, the name in a 6 line address is slightly cropped. If the address box were shifted to be fully visible in the address window intersection, the postal code would possibly be cropped depending on variations in folding. Given the postal code is more necessary than the recipient name, the bottom line is given additional clearance to reduce the chance of an unreadable address.
- As addresses are bottom-aligned, the postal code / city line will always be fully visible with clearance while the recipient name may only possibly be cropped in the case of a full 6-line address and envelope-top letter positioning. Given the likelihood of the second scenario, preference was given to greater city / postal code visibility.
Special Values / Cases
Blank and N/A
To display blank values and not applicable values (if format is not specified in its respective design document / mockup):
- If a field’s value is blank and the value is no longer updatable or significant to the object, the text “N/A” should be displayed.
- e.g. In a Document Order that has a Document Category of Credential, payment is never required, thus the Payment Reference/Transaction ID value will be blank and it should be displayed as “N/A”
- In all other cases, if a field value is blank, it should be shown as blank.
Text Content / Writing Guidelines
Useful Resources
“Guidelines for Writers and Editors” on https://education.alberta.ca/department/publishers.aspx
Capitalization
All capitals should only be used when displaying an abbreviation or acronym. E.g. ASN, SCM, FNMI. All boilerplate text should use sentence case except:
- Page title, button/action/menu label, field label – use Title Case
This means that PASI business entities (e.g. course enrolment) should not be written with title case.
See http://titlecase.com/ for more information.
Punctuation
Single lines of text or single sentences do not require a period. If there are more multiple sentences, then use punctuation appropriately (e.g. “No matches found” [no period]).
Button Notation
Buttons should be denoted with italics (e.g. “Click the Next button to continue”).
Contact Information
In External Views, if user is asked to contact Alberta Education for more information, the Alberta Education’s contact information from the official Contact Us website should be used.
- If the subject is credential, transcript, or document order related, the user should be directed to contact Student Records (Transcript and Diploma)
- For everything else, the user should be directed to contact the help desk
- Preferably, a hyperlink to the official Contact Us page should be used
- The link text should be the name used in the Contact Us page for help desk and Student Records, respectively (e.g. if the official Contact Us page refers to the help desk as “Help Desk”, the link text should read “contact the Help Desk for more information).
Common Terminology
- The following common terminology should be used when applicable
- Alberta high school
- Student information / student’s information
- Refers to connecting to a student in myPass, e.g. “Request a connection to student’s information”)
Appendix A - Common Data Element Formats
- Address
- Alberta Student Number
- Audit Information
- Binary Data
- Bit
- Boolean
- Code Value
- Credits
- Currency
- Date
- Date/Time
- Decimal
- Email Address
- GUID
- Integer
- Mark
- Multi-Line String
- Name String
- Organization Code (Format)
- Person Name
- Phone Number
- School Year
- Simple Multi-Line String
- Simple String
- String
- Time
- XML